Wednesday, June 13, 2018

Memorial Day Pork Butt

Well, its been a while, but we are back after a bit of a hiatus;  I got to say, it feels pretty good to be back. I primarily was writing this stuff for dad, and I guess after he died, I sort of drifted away - but we're back - ready to bring you more food and other excitement from Trout Lake. It will probably take a bit to get my land legs back, and remember how to drive this thing, but I guess all we have is time, right?

Over Memorial Day Weekend, we did a really nice pork butt. I'm not sure where they came up with 'butt' as the cut is actually the shoulder, but pork butt is a lot more fun to say.  We started out by making a rub. My Go-To ingredient for pork butt rub? Fennel Pollen. I love fennel with pork, but the seeds are a little much on butt (great in an Italian  Sausage)


Here we are after rubbing it up. It got rubbed the night before we cooked it - Then re-rubbed prior to sticking on the smoker


We cook butts over night. This is it going on at 10:00 PM  Friday night.


Fast forward to about 7:00 AM on Saturday, pop the lid, and low and behold, we have this beauty! At this point it gets wrapped in foil, and a little spritz of apple juice -


About another 3 hours and its ready. If you're not ready for it, just take the whole foil wrapped wad, wrap it in a towel, and place in a cooler. It will stay warm for hours. It shredded up very nicely.


Dinner is ready! 

Tuesday, July 22, 2014

Chicago Style Italian Beef Sandwiches

I was visiting the Midwest over the 4th of July, spending some time up at Arch & Alice's place in Tree' Lakes followed by a couple of days in Chicago. Arch and I had lunch at the Pine Isle breaking up a rough  day of boating. There it was on the menu.... The Italian Beef Sandwich... I thought these where more a Chicago phenomenon, but apparently their greatness has spread up to the North Woods.Well, the sandwich was outstanding  and it got me thinking - I've never tried to make these - Upon my return home I went for it. To enlarge the pictures simply click on them!


After some research on the Internets, I gathered the necessary items. I was a bit horrified to find out I needed bullion;  in the spirit authenticity I put my head down and moved forward. I     started out with a sirloin tip roast, some seasonings and garlic.


Hit the roast with a little olive oil, and then the herb / pepper mix. This included basil, oregano, onion powder, garlic and black pepper.  Easy cheesy  -


On to the grill it went - Underneath it was a pan with 6 cups water the bouillon and the remainder of the herbs. We let it cook until it reached 125 - It took about an hour and half. We removed it and the pan with the delicious juices.We let the roast cool, then popped it in the fridge.


After the roast cooled, it was sliced (on the slicer) very thin. I also cooked down the pan water, reducing it in about half.


Time to get this party started. A couple of handfuls of the meat into the warmed broth. It really only needs to go in there for about a minute.


... couple of spoonfuls of juice in the bottom of the bun, and then layer some meat - then some more juice - Then topped with some hot Giardiniera and served with onion rings. Traditionally you'd have a large coke with an Italian Beef, but keeping with the Three Lakes theme I rolled with a Mojito! These sammies were really delicious.  We'll certainly be putting them into the rotation - A  wonderful way to conjure up memories of a great trip to Three Lakes!


Monday, June 2, 2014

Stuffed Chicken Quarters

We did some boneless stuffed chicken quarters recently. I had tried doing something similar awhile back with a turkey. I had stuff the quarters with fresh mozzarella, but realized partial structural failure as some of the cheese ran out. My strategy this time was to reinforce with prosciutto and basil...lets gets this party started!


Started out with one of these - A fresh 4 pound chicken - He was brined overnight for about 13 hours.  I used1 gallon of water, 177g of salt, 86g of sugar, 2 lemons, 1/2 bunch parsley, smashed garlic and some peppercorns.


Boned him out - Ok, Jacques Pepin I ain't, but I got the job done. Left the hind quarters in tack - I'm doing some lunch meat with the breast - That's a slice of prosciutto in between the halves.

 Stuffed the thigh / legs with the cheese, basil and prosciutto to hold it all in. Seasoned, and then into the netting...I don't think they're going to get away!


Out to the grill - Cooked the over high heat for a couple of minutes to try to seal the bottom in an attempt to keep maximum amount of cheese within. Next, backed them off, and let them roast.


Here's the breast meat. We'll slice it on the meat slicer for sandwiches and salads.


Meanwhile, Doris does some asparagus on the gas bbq. The asparagus is so good this time of year. I love it!

Served with some noodle salad and Doris' homemade Boone Tavern buns - Love those things!


Why not an up-close cross section shot to inspect the goodness within? OK... Enjoy!

Leg of Lamb with Garlic Tahini Sauce

Awhile back, Doris came home with a boneless leg lamb for the weekend. We didn't have much of plan, so we stayed with the basics and it got the standard garlic, olive oil salt & pepper and lemon treatment. We didn't have any rosemary so we used thyme ..it's all about the ability to adjust...


It came in a netted bag of some sort. I wasn't sure if the idea was to cook in the netting, but I wanted to flatten it out some, so we opted to de-bag. Next we cut the excess fat off and tried to level it out just a bit..it had a ton of outer fat, so trimmed it pack to about an 1/8 to 1/4 of an inch.


something similar to this. We let it marinate for about 6 hours, brushed off the garlic, and through that hunk of leg on the grill


We got some new cast iron grates for the Weber that I've been breaking in. I like them so far- I'll like them more when they are completely seasoned and I don't need to worry about them rusting up on me, but all in good time I guess.


And served - . We cut up a bunch or garlic, then into the food processor with tahini, some lemon juice, parsley and a little water for the sauce. They were pretty good!

Sunday, April 6, 2014

Tri-Tip Tacos with Chipotle Rub

I was at the grocer the other day and something caught my eye. They had some really amazing looking tri-tip roasts. The marbling was outstanding and I couldn't resist. I left without a game plan, but with an amazing looking roast - I figured something would come to me -


For you scoring at home, the trip tip is a triangular shaped cut from the bottom sirloin. It's number 3 on the cow spotter.

We had a little Saturday Final Four action slated for the afternoon / evening so I wanted to keep things  simple - how about some tacos? Sort of a carne asada thing. Look at the marbling on that guy - I'm still impressed!


Started by grilling some sweet onions and a few Anaheims - This would be part of the salsa or condiments for toppers.


Tossed him on  after being  rubbed down with chipotle, coriander, fennel seed, cumin seed, pepper corn, kosher salt, brown sugar and mustard seed. Check out those new cast iron grates for the Weber!  Pretty deluxe -  This slab o' beef was the perfect sacrifice for their maiden voyage - After setting up a '2 zone' fire, we first hit it on both sides over the hot zone to get a nice crust.  After establishing the crust, we moved it off the direct heat and let it go to until it reached 125 degrees.


 Beanie likes to help - She also likes to stick her tongue out at me when I try to take her picture.


 Slice it up - looking good in there! Some pico de gallo ready for the tacos.


And served with a little rice and brewskis just in time for the second game - not too shabby for a rainy Saturday!

Sunday, March 30, 2014

Baby Back Ribs

It's beginning to get nice - you can feel it - The days are getting a little longer, the sun on occasion is beginning to show itself. Heck, baseball begins next week! With all of this, you think summer can't be too far off - Along those lines, I was getting a hankering for some summer food. We hadn't done ribs all winter. Unbelievable when you think about -  so the time was right. Ribs were on sale, I took a Friday off - Everything was in proper alignment.  You can click on the images to increase their size so you can see whats going on.


We will be making a rub and sauce - We're doing nothing out of the ordinary - Just the standard house, go-to recipe. Old school, baby! It's like 1974. We listen to the same music, we eat the same food, so something good must be going on.


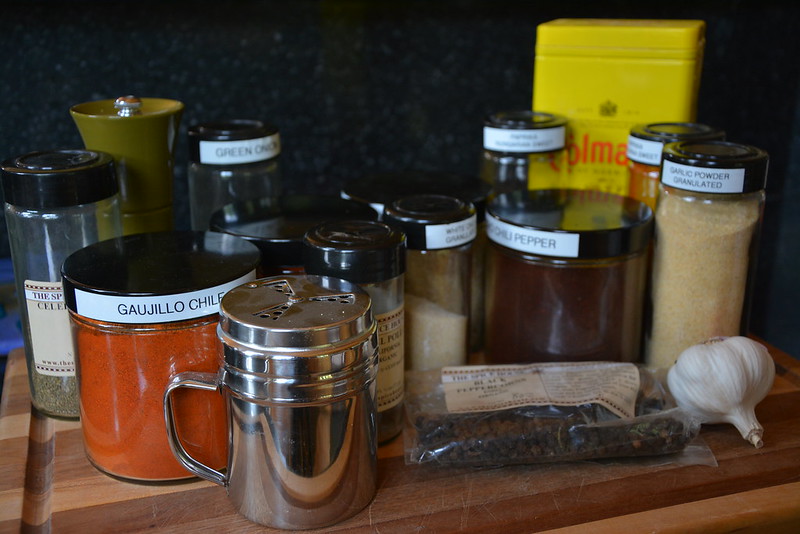
Let's get busy on the rub first. My biggest gripe with store bought rubs is that  they are too dang salty. They are like 50% salt - Yuck.  I prefer a spicy and lightly salty rub. There is no real recipe for these things, you sort of look at what you got and go for it. I like to use dried Guajillo, New Mexican, and chile arbol for the heat. Also dried garlic, onion, corridor seed, ground pepper and salt - 


Grind it all up, mix it up, and we have something that looks like the above.


After removing the membrane off the back of the slabs, we hit them with a little extra virgin olive oil and the rub.


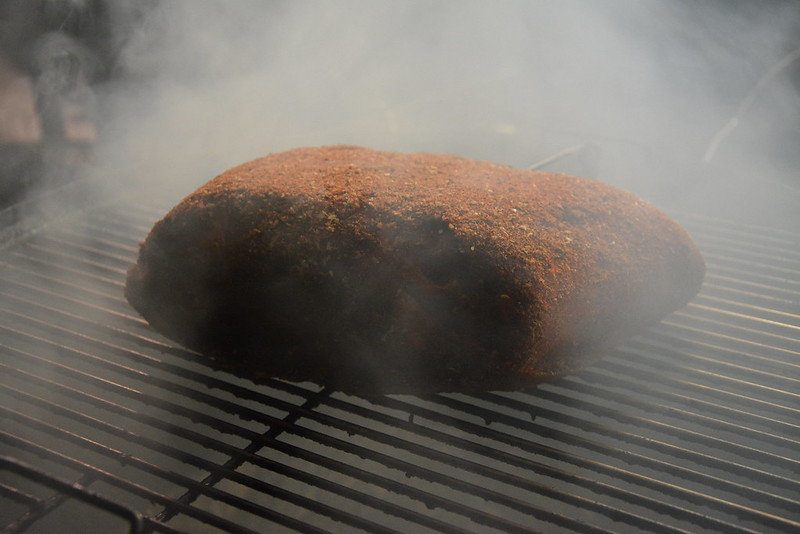
We're doing these on the Weber smoker at 235 degrees. We added a couple chucks of peach wood- The above is after about 3 hours. Got a little bark going on at this point. We begin to spritz them with apple juice every so often to keep them moist.


While the meat is doing its thing , we get busy on the sauce. I guess this is what they call a Kansas City type sauce. It's tomato based with sugar. I like to use palm sugar for the sauce. 


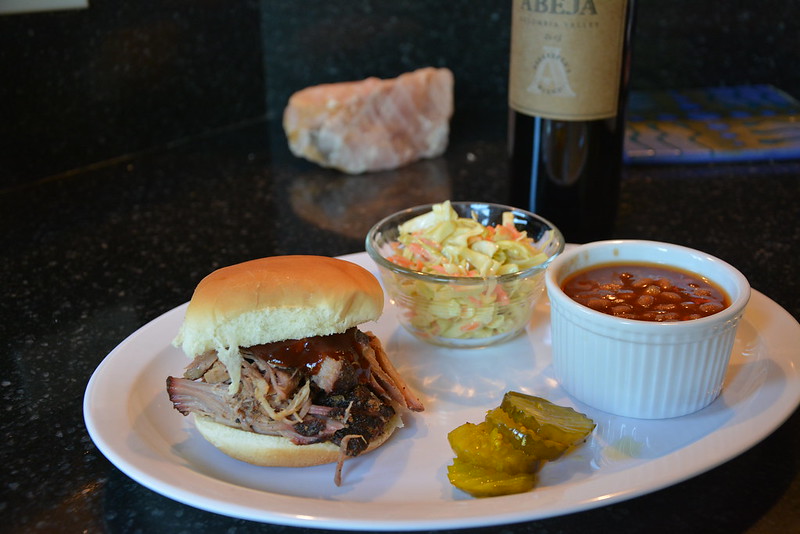
After about 5 hours, they get sauced, and flipped a couple of times for about 30 minutes.


Served there with some 'tater wedges - Summer really is coming - You can taste it!

Chile Rellenos


Making Chili Rellenos is an operation. We hadn't made them in years, but got the inkling a couple of weeks ago. We had a nice piece of pork so we thought we go for it. We base our recipe off the classic Diana Kennedy recipe - Ours take of course is geared to prepared outside.


We start out with some stuff. There's quite a few steps in the process and it really takes about all afternoon to do.


The recipe is traditional - Well, before we get our hands on it anyway. It calls for the pork to be boiled and then simmered - Not happening! We need to get some smoke on that thing first - On the WSM for about 3 hours with peach wood...


Then chopped up and into some cast iron - We need some pork induced liquid so we need to submerge and simmer for a bit ...


Cut up the pork,  add some onion, peppers, spices  and chicken broth  - Into the  pot and back on to the cooker.


We let it go another hour or so - just simmering to mingle the flavors, and get some of that sweet  pork juice a flowing.


While the pork simmers, we get busy on the chilies and tomato broth. Blister the peppers then into a bag to steam prior to peeling.


Meanwhile, we simmer the broth and get some beans going - Right now, the kitchen is beginning to smell pretty dang good.


Next we haul the pork in, and add some more deliciousness to the mix - Almonds, raisins, roasted tomato and spices.


After peeling the peppers, we make an insertion, and carefully remove the seeds and membrane from inside. Then they are stuffed with the pork.  At this point they are dusted with flour and dipped in a egg white bath and gently fried - Oh yea!


Smother in the tomato broth and served with rice and beans - These are tasty treat!